Whether you develop tutorials, play games, or demonstrate your application, having a fast and simple way to record Android screen will save you a lot of hassle.
Recording your Android device isn’t necessarily going to require downloading any additional applications or seeing any watermarks on your video.
If you’ve ever wished to find an easy and free tool for recording your Android device’s screen right on your computer, then SCRCPY is just one of the best options available.
I initially used SCRCPY to troubleshoot an Android app on my PC. Instead of loading up my phone with screen recording programs, I just connected it to my PC and began recording in minutes.
From that time on, this became the perfect tool for me for creating tutorials, gaming recordings, and app demos.
This guide will show you how to use SCRCPY to record Android screen, what you need for that, and a couple of tricks to enhance your videos.
What You’ll Need Before Recording
Before you start recording your Android screen with SCRCPY, make sure you have:
- A Windows, macOS, or Linux computer
- An Android phone running Android 5.0 or later
- A USB cable (recommended for stable recording)
- SCRCPY installed on your computer
- Android USB Debugging enabled
Sure, SCRCPY allows you to connect wirelessly, but using a USB cord works better. Things function more smoothly, and you’re less likely to have unexpected connection difficulties.
How to Record Android Screen Using SCRCPY?
Step 1: Enable USB Debugging
It does all this through Android Debug Bridge, or ADB, so you need to turn on USB Debugging on your phone first.
To do this:
- Open Settings.
- Go to About Phone.
- Tap Build Number seven times.
- Return to Settings.
- Open Developer Options.
- Turn on USB Debugging.
- Connect your phone to your computer.
- Tap Allow when the USB Debugging authorization message appears.
Step 2: Install SCRCPY
Download the latest version SCRCPY for your operating system and extract the files if necessary.
After installation:
- Connect your Android device.
- Open Command Prompt or Terminal.
- Navigate to the SCRCPY folder if needed.
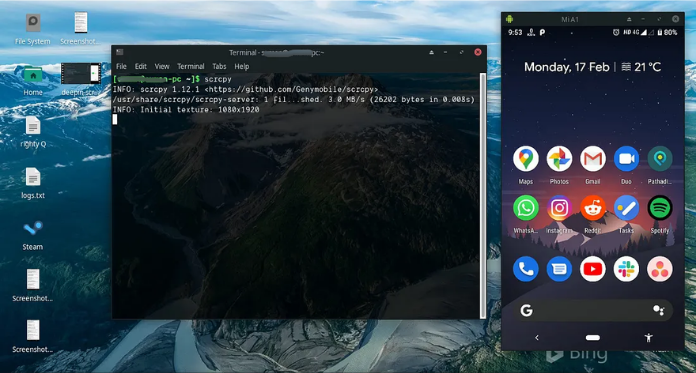
To verify everything is working, simply run:
scrcpy
You are prepared to record if the screen of your phone displays on your computer.
Step 3: Record Android Screen
Recording with SCRCPY is surprisingly simple.
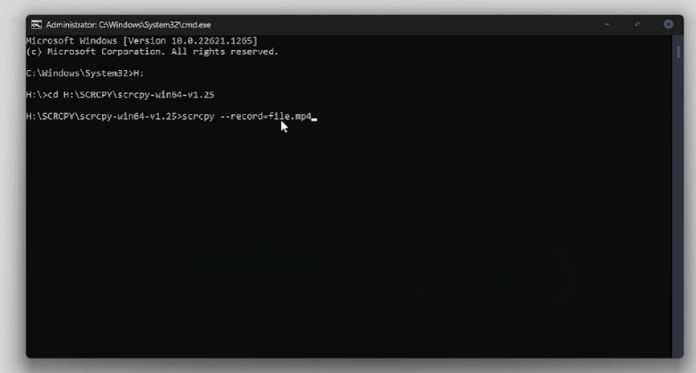
Run the following command:
scrcpy --record recording.mp4
As soon as SCRCPY starts, it begins recording automatically.
Everything displayed on your Android screen will be saved as:
recording.mp4
When you’re finished:
- Close the SCRCPY window.
- Press Ctrl + C in the terminal if needed.
The recording is automatically finalized and saved.
Useful SCRCPY Recording Commands
Save the Recording in a Different Location
You can also specify exactly where the video should be saved.
For Windows:
scrcpy --record C:\Videos\android-demo.mp4
For macOS or Linux:
scrcpy --record ~/Videos/android-demo.mp4
This makes organizing multiple recordings much easier.
Record Without Displaying the Phone Screen
Sometimes you just need the recording and do not want the mirrored screen to display.
Use:
scrcpy --no-playback --record recording.mp4
This can save resources by recording your Android device while hiding the display window.
Record While Limiting Resolution
If you’re planning to record for a long time or your computer isn’t the newest, dialing down the resolution helps things run smoother.
Example:
scrcpy --max-size 1280 --record recording.mp4
The recording remains clear while reducing CPU usage.
Record at a Lower Bit Rate
To reduce file size, you can lower the video bit rate.
Example:
scrcpy --video-bit-rate 4M --record recording.mp4
This leads to smaller videos that still remain high in quality.
Record While Using Fullscreen Mode
Start SCRCPY in fullscreen mode if you want a larger view when recording. You will have a distraction-free workspace and can use it for lectures, gaming, and presentations.
Example:
scrcpy --fullscreen --record recording.mp4
Once SCRCPY opens in fullscreen, recording starts automatically and is saved as recording.mp4 until you close the window.
Common Problems and Fixes
SCRCPY Doesn’t Detect Your Device
Make sure:
- USB Debugging is enabled.
- The USB cable supports data transfer.
- Your phone is authorized for ADB.
- ADB drivers are installed (Windows).
Recording Stops Unexpectedly
Try:
- Using a different USB cable.
- Reconnecting your phone.
- Closing resource-intensive applications.
- Updating SCRCPY to the latest version.
Video Quality Looks Poor
Increase the video bit rate:
scrcpy --video-bit-rate 8M --record recording.mp4
You can also avoid lowering the maximum resolution unless necessary.
Why Use SCRCPY Instead of Android Recording Apps?
A lot of Android screen recording apps clutter your experience with ads, watermarks, or limits on how long or how well you can record.
SCRCPY skips all that because everything runs straight from your computer. You get more control over quality and file sizes, too.
Developers, educators, content creators anyone who records Android screens a lot will appreciate that.
Final Thoughts
Looking for a quick and easy tool to record your screen on Android? Then Scrcpy is the one for you. It’s fast, high-quality, and extremely light – no rooting required, no monthly charges or any other hassle.
Once you’ve got it set up, recording is as simple as typing in a single command.
Whether you’re making tutorials, grabbing some gameplay footage, or showing off an app, scrcpy gives you solid, professional results without the hassle.
Try its recording options, and you’ll see the reason why scrcpy is so popular.