
Connecting your Android phone to your computer with a USB cable is the easiest way to use SCRCPY. But what if you want more freedom?
Maybe you want to control your phone while charging it somewhere else, demonstrate an app during a meeting, or test Android applications without keeping a cable connected.
That is where SCRCPY wirelessly becomes useful.
Through a wireless connection, SCRCPY helps in mirroring and controlling your Android device through the WiFi network without having to depend on the USB connection all the time.
After the setup, you will be able to use your keyboard and mouse to interact with your phone through the computer.
In this guide, we’ll explain how to use SCRCPY wirelessly, including the setup process for newer and older Android versions, performance tips, and common troubleshooting solutions.
What is SCRCPY Wireless Mode?
SCRCPY is a free and open-source tool that is used for mirroring the screen and controlling an Android device from your computer through the keyboard and mouse of your PC.
Normally, SCRCPY works through a USB connection. But it can also run through a wireless ADB connection that connects both devices through the same WiFi network.
Using SCRCPY wirelessly, you can:
- Mirror your Android screen without cables
- Use your keyboard and mouse to control programs.
- Transfer commands through WiFi
- Record your Android screen
- Test mobile applications more conveniently
The wireless mode is especially useful for developers, gamers, teachers, and anyone who wants a cleaner workspace.
Requirements Before Using SCRCPY Wirelessly
Before starting the setup, make sure you have the following:
1. Install SCRCPY on Your Computer
First, install the latest version of SCRCPY on your system.
SCRCPY supports:
- Windows
- macOS
- Linux
In addition, you will need the Android Platform Tools since wirelessly transmitting a device is done with ADB (Android Debug Bridge).
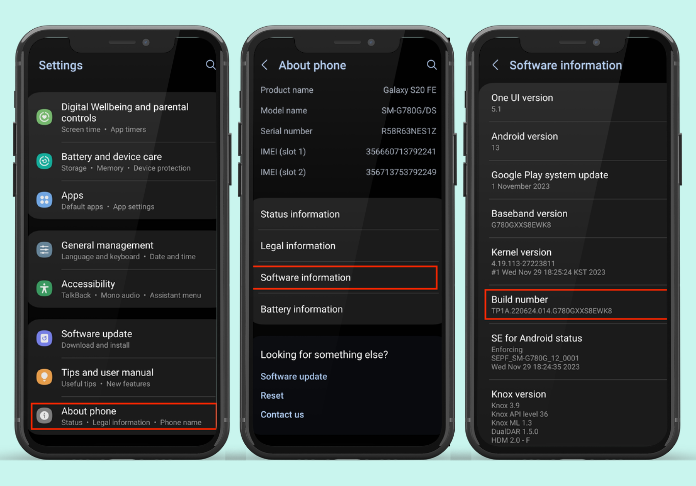
2. Enable Developer Options on Android
You must activate Developer Options in order to connect your phone wirelessly.
- Open Settings on your Android phone.
- Go to About Phone.
- Tap Build Number seven times.
- Enter your device password if requested.
- Developer Options will now be enabled.
3. Enable USB Debugging
After enabling Developer Options:
- Open Settings.
- Go to Developer Options.
- Enable USB Debugging.
ADB communication between your computer and your Android device is made possible via USB debugging.
4. Connect Both Devices to the Same WiFi Network
Your Android device and PC must be connected to the same WiFi network.
For example:
- Phone → Home WiFi
- PC → Same Home WiFi
If not, then you won’t be able to establish the connection.
Method 1: How to Use SCRCPY Wirelessly on Android 11 and Newer
Android 11 brought Wireless Debugging that makes the procedure much simpler.
You can connect SCRCPY without using a USB cable.
Step 1: Enable Wireless Debugging
Open:
Settings → Developer Options → Wireless Debugging
Turn it on.
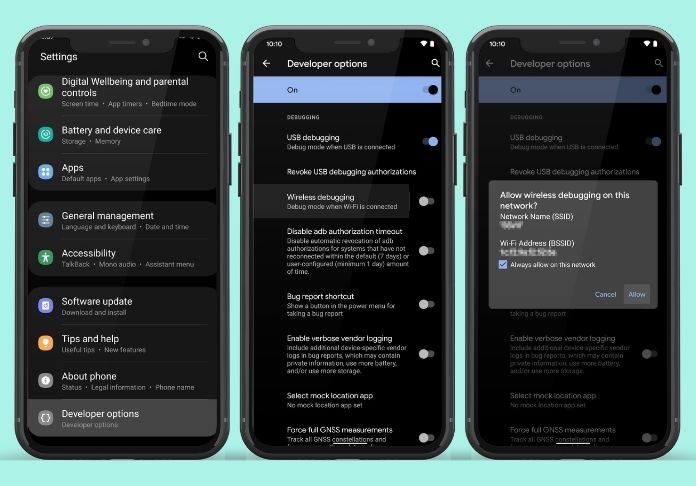
You may see a security confirmation. Allow it.
Step 2: Pair Your Android Device With Your PC
Tap:
Wireless Debugging → Pair Device With Pairing Code
You will see:
- IP address
- Port number
- Pairing code
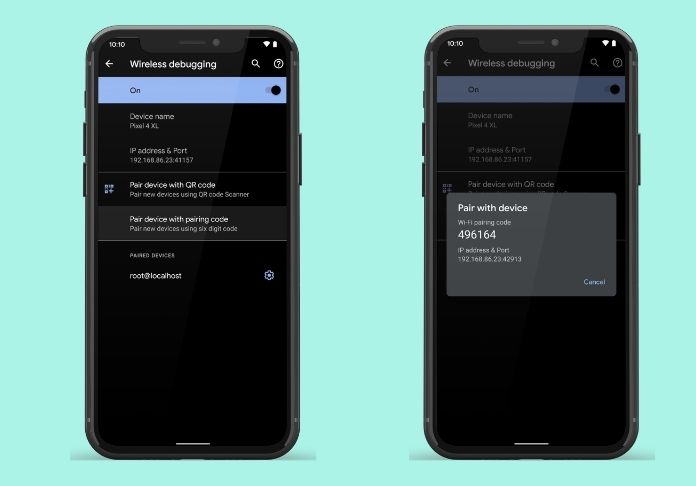
Keep this screen open.
Step 3: Open Command Prompt or Terminal
On your computer, open:
- Windows: Command Prompt or PowerShell
- macOS/Linux: Terminal
Run:
adb pair IP_ADDRESS:PORT
Example:
adb pair 192.168.1.25:37001
Your computer will ask for the pairing code.
Enter the pairing code appearing on your Android device.
If successful, your phone is paired.
Step 4: Connect Your Phone
Now run:
adb connect IP_ADDRESS:PORT
Example:
adb connect 192.168.1.25:5555
Step 5: Start SCRCPY
Finally, run:
scrcpy
Your PC can display the screen of your Android device wirelessly.
Method 2: How to Use SCRCPY Wirelessly on Android 10 and Older?
The older versions of Android lack Wireless Debugging, hence requiring the use of a USB cable for the setup process.
After that, you can remove the cable.
Step 1: Connect Your Phone Using USB
Connect your Android device to your PC.
Check that ADB detects your device:
adb devices
You should see your device listed.
Step 2: Enable TCP/IP Mode
Run:
adb tcpip 5555
This changes ADB from USB mode to network mode.
Step 3: Find Your Android IP Address
On your phone:
Go to:
Settings → WiFi → Your Connected Network
Find the IP address.
Example:
192.168.1.5X
Step 4: Disconnect the USB Cable
Remove the cable from your phone.
Step 5: Connect Using WiFi
Run:
adb connect 192.168.1.50:XXXX
If everything works correctly, you will see:
connected to 192.168.1.50:XXXX
Step 6: Launch SCRCPY
Now simply run:
scrcpy
Your phone screen will appear without the USB cable.
How to Disconnect SCRCPY Wireless Connection?
When you finish using SCRCPY, you can disconnect your device using:
adb disconnect
This removes the current wireless ADB connection.
To check connected devices:
adb devices
Final Thoughts
By using SCRCPY in wireless mode, you will have the capability of displaying and steering your Android phone through a wireless connection with no wires involved.
After setup, you can manage your phone, test apps, record screens, and access Android from your PC.
It is important to use the best possible 5 GHz WiFi connection and change some SCRCPY options depending on the situation.
Although it is true that you may have lower latency with the help of USB, wireless SCRCPY is more convenient. With a few ADB commands, you can turn your Android device into a convenient desktop companion.