
In case you want to control your Android phone from the PC, screen mirroring or using apps such as Scrcpy, you need to enable USB Debugging on your device.
Although it’s often seen as a developer feature, USB Debugging is essential for everyday users.
It allows you to mirror your screen, control your phone with a keyboard and mouse, record your display, or even use your device wirelessly without rooting it.
Since the steps vary slightly between Android brands, this guide shows you how to enable USB Debugging on Samsung, Google Pixel, Xiaomi, OnePlus, OPPO, vivo, Motorola, Realme, Nothing Phone, and more, so you can quickly get started with Scrcpy.
Steps to Enable USB Debugging on Android (All Brands)
USB Debugging is hidden by default.
First, you’ll need to unlock Developer Options. Fortunately, this process is almost identical across every Android phone.
Step 1: Open Settings
Launch the Settings app on your Android device.
Step 2: Open About Phone
Scroll to the bottom and tap:
About Phone
Some manufacturers may use:
- About Device
- Device Information
- My Phone
Step 3: Find Build Number
Depending on your Android version, the Build Number may appear under:
- Software Information
- Version
- Software Version
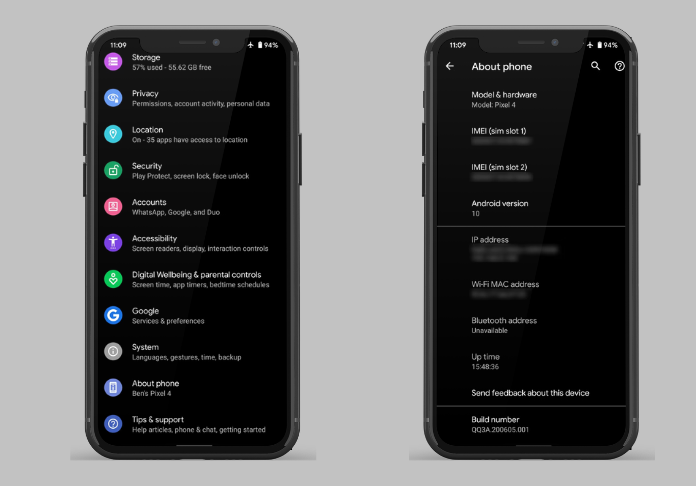
If you can’t find it immediately, use the search bar in Settings and search for Build Number.
Step 4: Tap Build Number Seven Times
We have to tap Build Number seven consecutive times.
In most cases, there are different options to tap, as given below:
- Software Version
- OS Version
- MIUI Version
- HyperOS Version
Next, tap the relevant option seven times, as its name and location may vary depending on your Android brand and version.
If your phone has a screen lock enabled, Android will ask you to enter your PIN, password, or pattern.
Once complete, Android displays:
“You are now a developer!”
Developer Options have now been unlocked.
Where to Find Developer Options?
On most Android devices, you’ll find Developer Options in one of these locations:
- Settings → System → Developer Options
- Settings → Additional Settings → Developer Options
- Settings → Advanced Settings → Developer Options
- Settings → Developer Options
The exact step depends on your phone manufacturer, which we’ll cover in the next sections.
| Android Brand | Developer Options Location |
| Samsung | Settings → Developer Options |
| Google Pixel | Settings → System → Developer Options |
| Xiaomi / Redmi / POCO | Settings → Additional Settings → Developer Options |
| OnePlus | Settings → System Settings → Developer Options |
| OPPO | Settings → System Settings → Developer Options |
| Realme | Settings → System Settings → Developer Options |
| Vivo | Settings → Developer Options |
| Motorola | Settings → System → Developer Options |
| Nothing | Settings → System → Developer Options |
| ASUS | Settings → System → Developer Options |
| Sony | Settings → System → Developer Options |
| Nokia | Settings → System → Developer Options |
| Huawei | Settings → System & Updates → Developer Options |
| Honor | Settings → System & Updates → Developer Options |
| Infinix | Settings → Developer Options |
| Tecno | Settings → Developer Options |
Why Does Scrcpy Need USB Debugging?
If you’re reading this article, then you want to use Scrcpy; enable USB Debugging is the very first requirement.
Scrcpy uses the Android Debug Bridge (ADB) to create a fast, low-latency connection between your Android phone and your computer.
Without USB Debugging enabled, Scrcpy won’t be able to detect or control your device.
Importantly, enabling USB Debugging will not change anything on your phone and will not invalidate your warranty. It just grants your PC access to your phone once you accept the connection.
Once it’s turned on, you can take advantage of some incredibly useful features.
Mirror Your Android Screen
Scrcpy shows your Android screen directly on your computer without looking down at your phone.
This is perfect for:
- Watching videos
- Presentations
- Demonstrations
- Live streaming
- Screen recording
Control Your Phone with Keyboard and Mouse
Typing long messages on a phone isn’t always convenient.
Thanks to Scrcpy, your PC’s keyboard and mouse become the main controller of your phone and will help you navigate through your Android quickly.
You can:
- Open apps
- Reply to messages
- Browse social media
- Install applications
- Manage files
All without touching your phone.
Record Your Android Screen
Need to create a tutorial or record gameplay?
Scrcpy includes built-in screen recording support without requiring third-party applications.
It’s widely used by:
- YouTubers
- Android reviewers
- Developers
- Teachers
- App testers
Use Scrcpy Wirelessly
Many people assume Scrcpy only works over USB.
Actually, once USB Debugging is enabled and your device is paired, you can switch to a wireless connection over Wi-Fi.
That means:
- No USB cable clutter
- Greater freedom
- Cleaner workstation
- Remote Android control
No Root Required
One of Scrcpy’s biggest advantages is that it works without rooting your phone.
In contrast to other Android managers, Scrcpy provides both security and complex features to use.
Is USB Debugging Safe?
Yes, USB Debugging is completely safe when used correctly.
Enabling it doesn’t expose your phone to the internet or automatically grant access to your data. Every new computer must first be approved through an authorization prompt on your phone.
You’ll typically see a message asking:
Allow USB debugging?
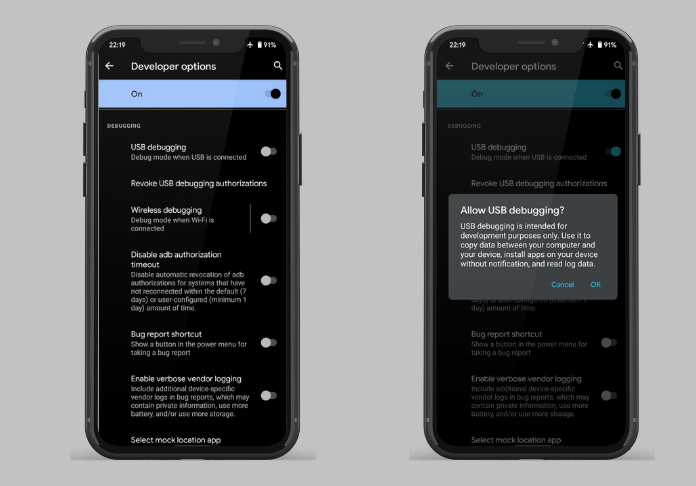
Only after tapping Allow will that computer be able to communicate with your device.
For extra security:
- Only connect to trusted computers.
- Don’t authorize public or shared PCs.
- Turn off USB Debugging when you’re finished using it.
Normally, people turn on USB Debugging only when working with such applications as Scrcpy, Android Studio, or ADB commands.
Wrapping Words
Enabling USB Debugging is quick and easy, no matter which Android brand you use.
Upon enabling it, the user will be able to connect their phone with Scrcpy and enjoy services such as screen mirroring, controlling the screen through a mouse and keyboard, screen recording, and others without having to root the phone.
If you have trouble connecting, simply check that USB Debugging is enabled, approve the authorization prompt, and use a compatible USB cable.
With everything set up, you’re ready to get the most out of Scrcpy and manage your Android device directly from your PC.